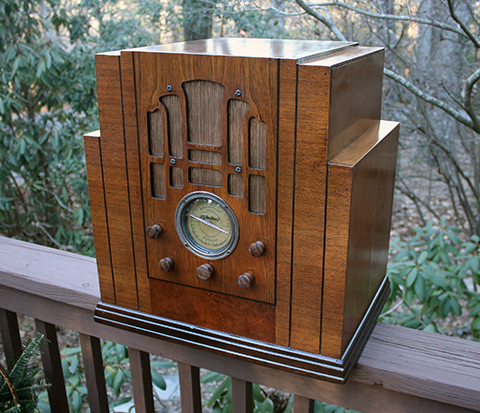
A Century of Progress was the world’s fair held in Chicago 1933-1934. It showcased the latest industrial design. This radio was inspired by that event and is thus called the “World’s Fair” radio. Sears sold a few versions in similar cabinets; my example is the 1850 that runs on batteries and has five knobs. It was in the Sears & Roebuck catalog #169 for Fall/Winter 1934/35, p. 533, and in the next catalog #170 on p. 475 (see image). The price was $32.50 (equivalent to $703 today). The text in the catalog read:
Airplane easy tuning dial. Includes Three longer life Silvertone “B” Batteries and Improved 6-month Dry “A” Battery. Designed in the spirit of World’s Fair architecture and constructed by master cabinet makers, with front of carefully matched walnut and Madrone burl veneers. Remainder in Walnut finish. All batteries contained inside the cabinet. Complete with tubes and batteries described above and aerial kit.

OUTSIDE: ART DECO… INSIDE: THROWBACK TO 1925
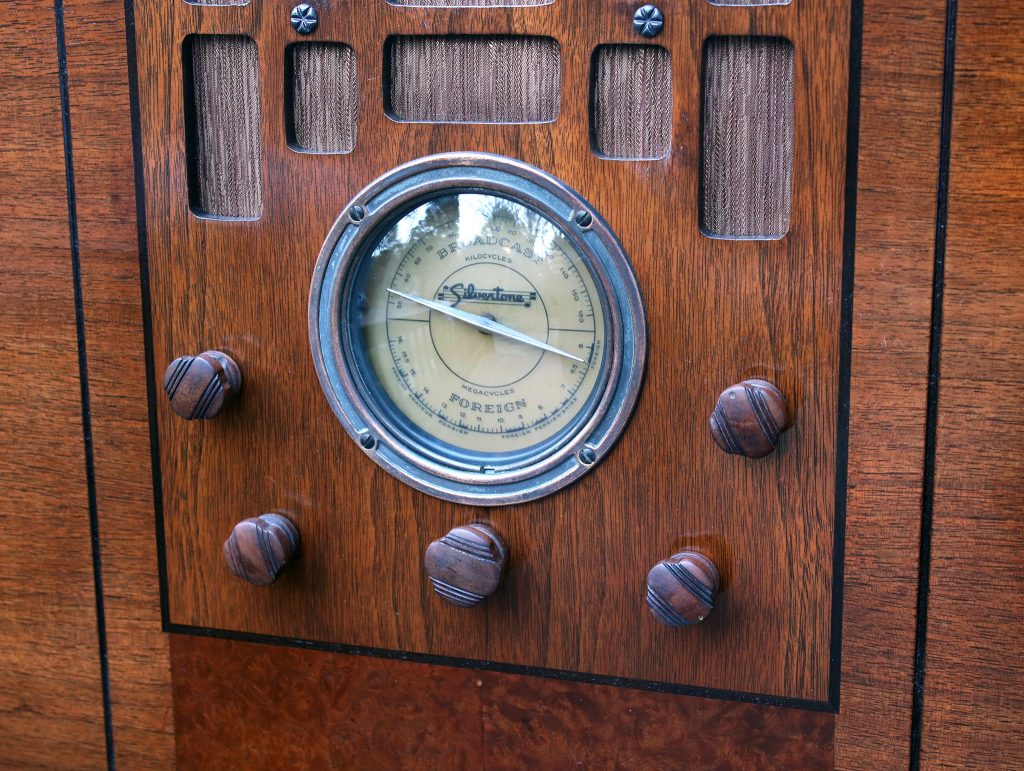
The 1850 is a cool looking radio, with nice veneers on the front, but is a study of design-to-price. The cabinet is large (18.5” W x 18.5” H x 12.9” D) in order to hold all the batteries. The dial window is roughly 4” diameter. The chassis is 10.1” wide. The plywood on the sides is thin but adequately braced inside. There is no joinery…it was nailed and glued together. I like the wood knobs.
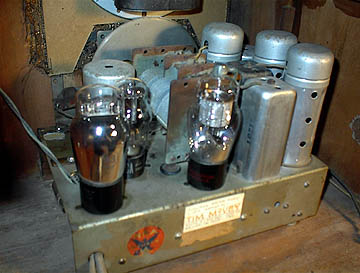
This superhet uses 5 tubes (951, 951, 30, 32, 33) plus a 1A2 ballast tube. These tubes are from the family of 2V, directly heated lower current filament types introduced in 1930. It tunes AM 550-1600 kHz, and SW 6.0-15.0 MHz, with no RF amp. An outdoor antenna and earth ground are needed for best performance. There’s no dial lamp.
The SW band scale cannot be readily calibrated. One can adjust the oscillator trimmer to get the AM band to line up with the dial, but there’s no adjustment for SW—one must manipulate a couple of turns on the SW oscillator coil as needed. Then again, it’s not super important to calibrate the dial since the entire 6-15MHz range is on a tiny 3” diameter scale! I assume the listener would browse by just turning the knob until something interesting was heard.
The 33 tube drives the speaker directly (i.e. no output transformer). The speaker is a 6.5” diameter magnetic reed (aka “moving iron speaker”) type, which i later discovered sounds decent in this cabinet but is inherently incapable of high quality sound. In 1935 there was really no alternative for a battery operated set. There is a TONE control, which is a 500K pot that shunts a .02uF cap across the speaker. It has a strong treble cut that can be very helpful. The speaker is marked JUN 20 1934 and is undamaged.
Another throwback to the 1920’s: the VOLUME control is a rheostat that controls the filament voltage of the first two tubes (the mixer and the IF amp)! So you get the same experience as the 20’s battery sets: volume control has a delayed action because it’s actually heating up or cooling down a tube filament. The set has an AVC that works over a limited range of signal strengths, but just like the 20’s TRF’s you have to manage the right amount of signal into the detector tube. So if you adjust the volume for distant stations, a strong local will blast you. Turn it down enough to prevent the local station from blaring distortion, and the radio isn’t sensitive enough to hear the distant stations. I wonder if Sears got a lot of complaints about this?
The ballast tube was a curiosity to me, especially since it’s in a UX-base, T-8 bulb envelope. The schematic calls for a “30 Ballast,” and these are scarce. This radio has a Silvertone-branded 1A2 in this spot, but it had been bypassed by someone in the past. The answer was in an article in Radio-Craft (Jan. 1939): the 1A2 was a crude current regulator designed for operating 2.0V tubes from 3V dry cell batteries. Just a simple filament inside a glass envelope. I left the 1A2 in the socket for appearance.
1935 must have been an interesting time for rural electrification. Sears offered this radio as a 60Hz AC powered model, a 25Hz AC powered model, and this battery model. It seems odd this wasn’t designed like farm radios using battery tubes that would run off a single 6V car/tractor battery. No, this radio needs three 45V B batteries, an A battery, and one of those multi-tap C batteries to bias the grids! The B batteries would be placed around the chassis, and the A battery slipped into a compartment underneath.
Radiomuseum.org says this radio was manufactured by Colonial Radio Corp. of Buffalo NY.
This was one of the first antique radios I purchased, at a yard sale for $10, back in 1982. I had put a label inside that I fixed it on June 30, 1982. Not knowing better at the time, I had stripped the cabinet and then re-did it using Tung Oil. This finish held up for a few years before it dried out and got blotchy. I replaced all the capacitors (the electrolytic block was leaking and was discarded), and built a battery tray of lots of 9V and D batteries. The radio did not play well: poor sensitivity and barely audible. So 40 years later I decided to complete the job properly with the benefit of experience, to include both a refinish and electronic work.
The electronic work consisted of:
- check all the caps…they were still good
- replace all but two of the resistors. All of them had increased 50-100% in value
- lubricated all moving parts; rejuvenate the rubber grommets under the V.C.
- check all transformers
- clean all contacts with alcohol, dry, then treat with DeOxIt
- refurb the two controls, band switch, and the power switch (the last item didn’t work)
- test all the tubes
- perform alignment (all the adjustments were off)
The type 951 screen grid tube was specified for this radio. The 951/1B4 is expensive, so I kept the 1A4’s that came with the radio originally. They work fine.
Also, after doing all the circuit work, I noticed a high level of distortion. I reasoned this might be due to excessive signal into the detector, so I swapped out the 32 tube. Sure enough, a different 32 improved the performance. Just like 1920’s radios.
The radio performance is decent. If operated in a city with a bunch of close-by stations, just a piece of wire laid out under the carpet would be sufficient as an antenna. I used an outdoor long-wire and earth ground, and found a couple dozen AM stations by day and a lot more at night. The SW dial could be “browsed” for dozens of stations. It was oddly fun to tune across: the selectivity is good across the band and when a station came in, the volume and tone controls could be adjusted to achieve good sound.
So this is an interesting antique radio, but it takes a bit of getting used to. Once you learn to manipulate the volume control, you can tune across both AM and SW and find plenty of stations to listen to.
I wondered how good this radio would sound if not limited by that speaker. After I got this radio aligned and working properly, I coupled a modern hi-fi speaker to the 33 through a huge Hammond audio transformer (with tested flat response down to 20Hz). It actually sounded quite good, with clean bass, and no hum. There is the usual 2 to 3 percent THD. Those old 33 pentodes were pretty good tubes and could deliver almost 1 watt of power. I used this speaker while aligning the radio and swapping tubes to get it to its best performance.
Power for the radio was supplied by an ARBE-III for testing. But for long term use I needed something that could be left inside the cabinet. The C bias (-3.0 and -4.5V taps) is easy: just mount 3 AAA battery holders out of sight and wire these in permanently. For B, the total plate currents would be expected to total ~32mA. For A, the total filament current is 500mA @ 2.0V. I built a simple linear power supply out of junk box parts, and using a Triad VPT24-2080 transformer. Note the original set called for 135V plate “B” voltage on the 33 tube. I ran it on 90V so I wouldn’t need a special transformer. This setup works great.
CABINET
In order to get the finish right, I followed the Sears catalog illustration and looked at as many photos as i could find on the web. The cabinet was not very dark, and the base moulding seems to have a darker, contrasting stain. The veneers are attractive on their own. The inside of the scrollwork for the speaker was finished black, as were the two vertically routed grooves that surround the center part. The catalog says it was finished in walnut.
It was difficult to remove the tung oil and bits of the original finish I didn’t get off the first time. Fortunately the original stain and pore sealer remained intact. I used black stain to get the black features correct. After stripping I had to even out the stain and do a lot of fine sanding and buffing. The base moulding got some dark walnut toner. Finally after the cabinet had thoroughly dried for several days, I was ready to apply the nitrocellulose lacquer. My HVLP sprayer was on the fritz so I just used spray cans: Mohawk “UltraFlo Clear Lacquer, Gloss” M102-0450. Several coats were built up and the final result was quite professional looking and probably not much different from the factory original.
I had to replace the grill cloth because the original had disintegrated. After a bit of cosmetic detailing, the radio looks great, plays well, and it was nice to finally complete a project after 40 years.